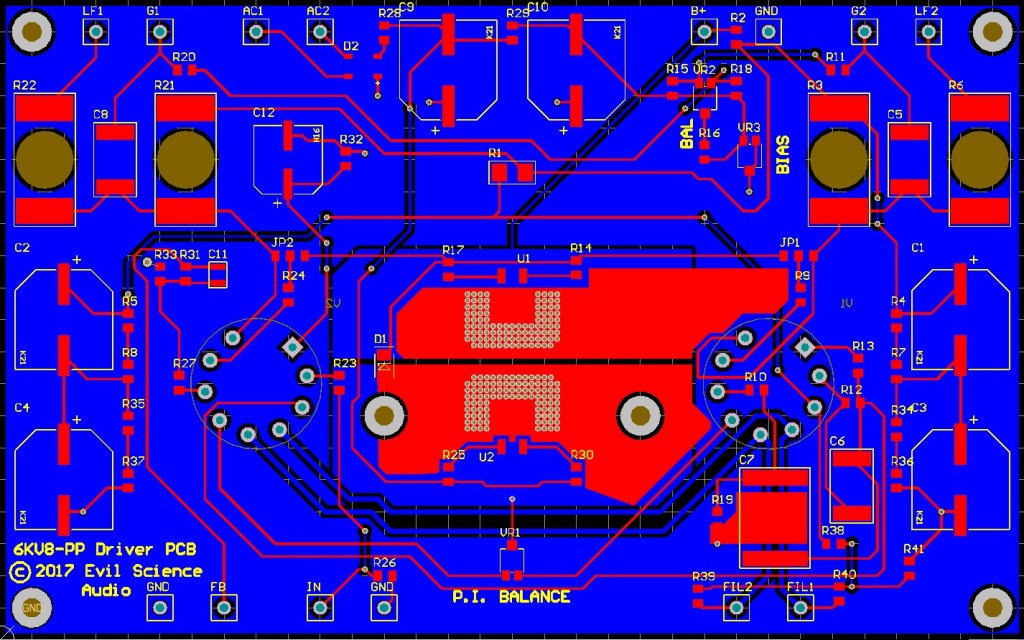
6KV8 Push-Pull Driver Board
Here’s a look at a design project I’m working on. This is a driver circuit for a push-pull amplifier designed around the 6KV8 tube. The 6KV8 tube is a high-gain triode with good linearity and high transconductance coupled with a frame-grid pentode also having a high transconductance. Tubes like this were designed for television applications, not audio. Here the triode sections of the two 6KV8s are connected as an active-loaded gain stage, which then feeds the two pentode sections acting together as a phase inverter and driver section. The pentodes use IXYS programmable current sources to help linearize their operation. The circuit includes local power supply filtering and the negative bias supply. There are two options for feedback loops. One loop goes to the cathode of the lower pentode, and makes a standard feedback loop. The other is plate-to-plate loops from the output stage via connections LF1 and LF2. These are both subject to some experimentation when the prototype PCBs arrive and are stuffed.
This is the art of the PCB itself. This is where my project is different from what you’ll usually see in PCBs for vacuum tube audio. Other than the tube sockets, all components are surface mount. This is the more modern assembly method for electronics. The possible disadvantages are how the PCB will handle waste heat, and the limits on component selection. You can see in red the large copper area used as a heat sink for the current source components, which if effective will eliminate the use of a standard aluminum heat sink.
More to come when the prototype is ready to test!
Push-Pull 7C5 Amplifier in Vintage Style
Here it is, finally! Oh, and I hope you like green! This is a complete rebuild of my very first amplifier. Using everything I’ve learned since that time, I began this project with the goal of creating an artistic and functional version of that design. The tubes, output transformers, and a few internal parts remain from the original build. A new power transformer was used, as well as the new chassis, sockets, and other internal parts. Being mostly the same circuit and parts, it sounds exactly the same.
The schematic shows what few changes were made:
- The 7C5 screen grids are supplied from the plate B+ through 100 ohm resistors instead of a separate filter section. This is more protective of the 7C5s, whereas the prior connection gave no noticeable improvement.
- The power supply filter capacitors are reduced to 50 & 50 µF, from 100 & 100 µF. 100 µF is too large a value to follow a standard 5U4 rectifier, and can cause the tube to arc-over internally.
- The 7C5 cathodes are bypassed to ground instead of to B+, which is known as “Ultrapath”. Other than more expensive higher voltage capacitors, “Ultrapath” resulted in no discernible difference.
Single-Ended 807 Amplifier
This amplifier was built on-the-cheap. I used salvaged transformers purchased well below online prices and 807 tubes which are still reasonably priced. 7 watts per channel. I won an impromptu local “shootout” with this. Recently added speaker/headphone switch and headphone jack. Now it’s personal!
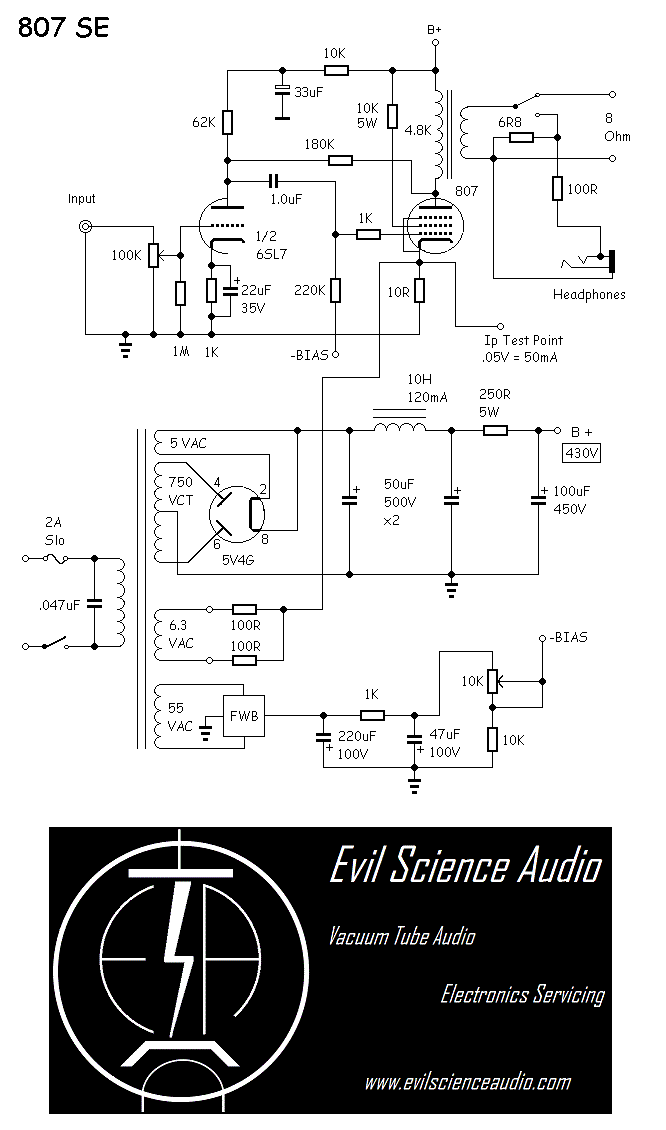
How it was done: Single-ended pentode mode, with primary-side feedback, and fixed bias operation.
A look at the construction:
14N7/14AF7 Loktal Preamplifier
Here’s a long time workhorse in my setup. Four line-level inputs are on the selector switch, and active/passive mode is selected by the toggle switch in the center. Can easily be rewired to accept 7N7 or 7AF7, so that more types become usable. Collecting tubes is more fun when you can use some!
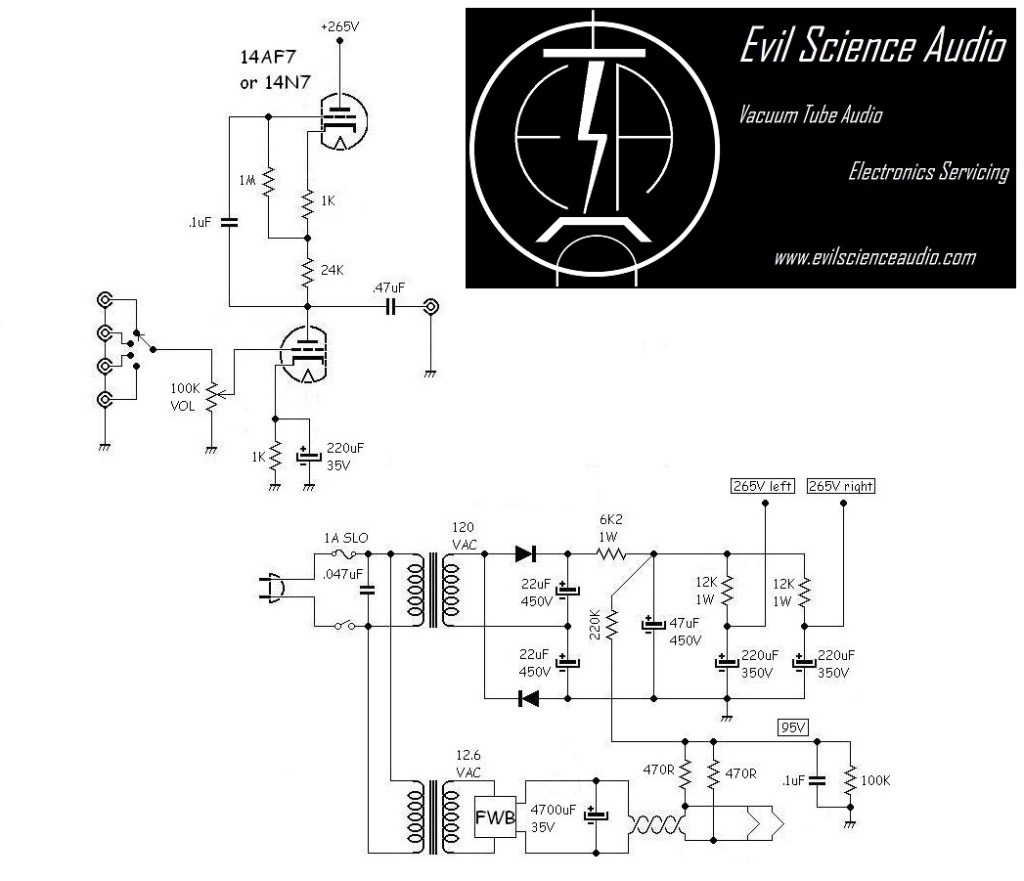
The Schematic. This preamp has its two 14N7 or 14AF7 tubes connected as CCS (Constant Current Source) loaded single gain stages. The idea here is to be able to use one stage of gain without feedback. Using the CCS load makes the stage linear enough that it does not require feedback. This does nothing for hum & noise of course, so the power supply is critical and thus somewhat complex. To read more about CCS loading, check out section 11-7 of Vacuum Tube Amplifiers by Valley & Wallman:
Single Ended 6K6 Amplifier – a Gift!
Built for my Mother-In-Law as a Christmas gift! This little amplifier has a headphone jack and volume control up front, speaker terminals in the back, and a power switch with blue LEDs. The color, a light textured metallic blue, is a new color for me and with that blue power switch just looks awesome! She was so impressed with my wife’s darling amplifier (below), that this one was intentionally modeled after it. If I can find a matching pair of 6K6G tubes (you know, the big bottles), those would look really nice in this!
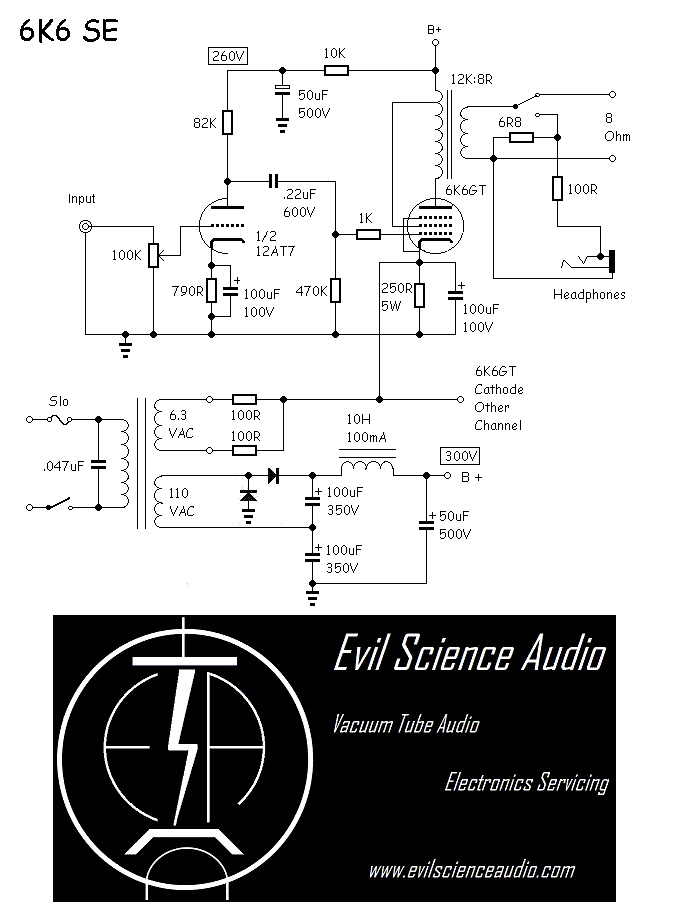
The schematic. This is a very similar design to the 6Y6SE I’ve already posted, which was also a made-to-fit-the-parts design. The 12K:8 output transformer has a primary tap but isn’t a distributed load type, just multiple impedances. Connecting the 6K6 this way was just like triode connection, and no loop feedback was needed. It has limited power output but is very nice through headphones, with no hum or noise.
Single-Ended 6B4G Amplifier
This is my current favorite and latest build. This is the cure for any single-ended amplifier addiction. It is built on a 17″ x 10″ hammertone-painted steel chassis, and features Transcendar output transformers and an Edcor power transformer. This is the first directly-heated triode amplifier I built for myself, and had the time to wrap my ears around. It’s an amazing synergistic match to my sealed-enclosure speakers, and sounds outstanding at moderate listening levels.
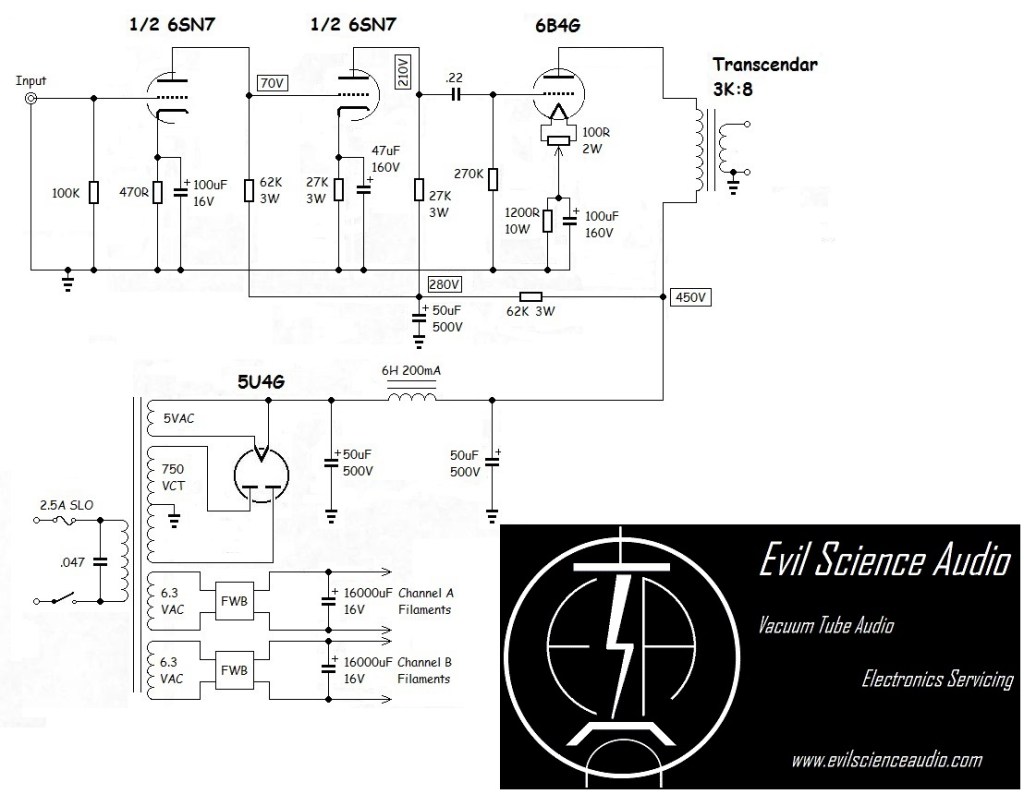
This is as simple as such an amplifier can be, and I always believed shorter is sweeter when it comes to audio signal paths. The two 6SN7 triode sections are directly coupled, with one capacitor coupling to the output tube. All stages are cathode-biased and bypassed to ground. A worthy experiment might be to connect the output tube cathode bypass cap from the cathode up to B+, a connection often referred to as ‘ultrapath’. The power supply is very ordinary, but has a high inductance high current choke to keep hum down. The heaters and filaments are all supplied a rectified and filtered 6.3 VDC. Hum balance potentiometers are used across the output tube filaments so any hum there can be adjusted out at that point. See the global feedback? Nor do I! There isn’t any! This runs open-loop. The large output triode should help to keep output impedance down, but it will still be somewhat high, so damping will be poor. This requires the right sort of speakers to use effectively. When it does work out, it has punch, bounce, and puts you right there with those musicians. The bad news? This amplifier will reveal all of your poorly recorded music, and change your musical tastes to well recorded music.
Single-Ended 1626 “Darling” Amplifier
This is an amplifier type often referred to as the “Darling”. It uses a WWII-era oscillator triode, the 1626, as an output tube. This is all about finesse, as the power output of this tube is only 3/4 of a watt! This is built on a hammertone-finished steel chassis, and features volume control and headphone jack. This was built as a gift for my wife, and she uses it in her office with mini speakers, or headphones, and her IPod as source.
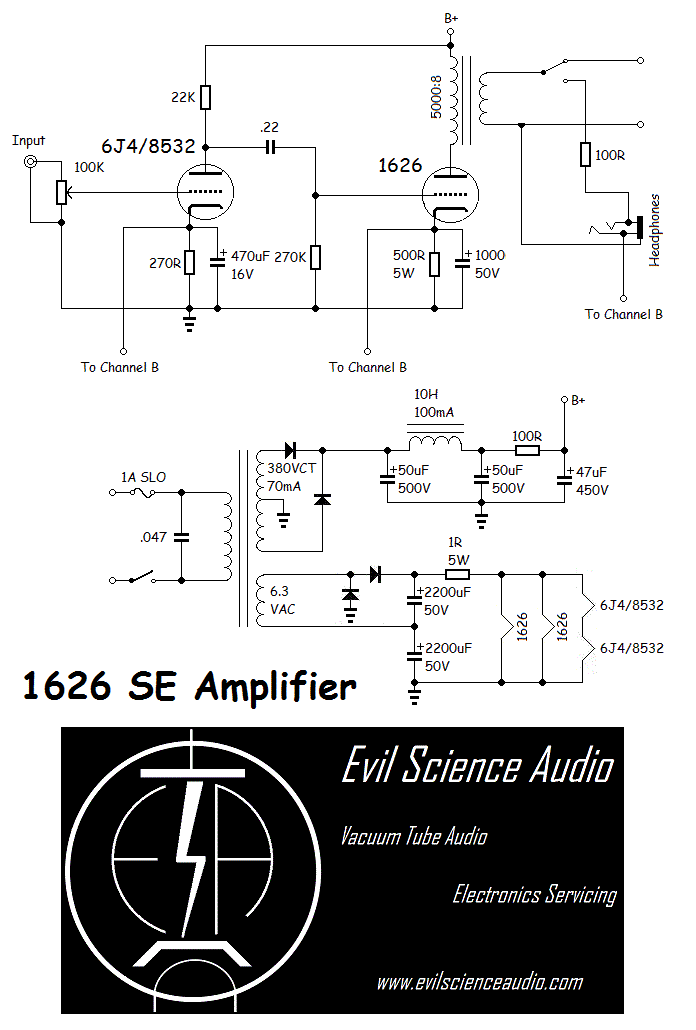
Here is the schematic for the 1626 SE amp. A three-stage CLCRC power supply filter was needed to reduce hum to inaudible for headphone use. A voltage doubler supplying DC to all filaments was used for the same reason. Otherwise a very normal audio signal path. The 6J4/8532 is an interesting tube to use here. It is one triode per tube, and often microphonic, meaning it picks up mechanical vibration and amplifies it. This means I had to try several before finding two good ones. The 8532 version of the 6J4 is usually better. Another feature of this design is that the two channels share the cathode resistors & bypass capacitors of each stage. Although output is an amazing 3/4 of a watt, it sounds very nice on headphones and speakers that are sufficiently efficient.
Single-Ended Loktal amplifier
This interesting little amplifier started life intending to be a loktal version of the 6Y6 amplifier already posted. I did not get the results I was hoping for with it, so it was redesigned. Here you see the amplifier built on a Hammond powder coated black chassis. In front are two 7B4 tubes as voltage amplifiers, and behind are two 7A5 tubes as power output. The design will take 7B5 and 7C5 just as well. The transformer cover is actually a pre-painted diecast aluminum box also made by Hammond.
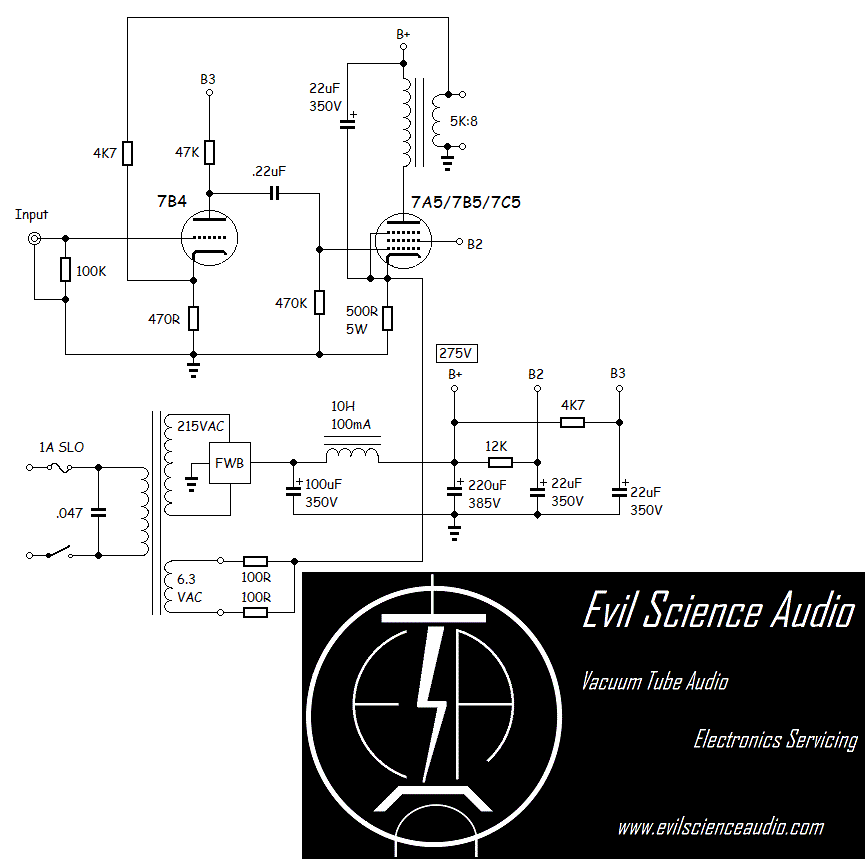
Here you see the design of the finished amplifier. The power supply is solid state with heavy filtering to keep hum from the b+ supply. The voltage supply to the 7B4 tubes and the output tube screen grid voltage supply are not stacked, allowing the 7B4 plate voltage to be higher. This gives some improvement in gain and linearity. The output tubes can be any of 7A5, 7B5, or 7C5. All three have the same base pinout. Although the three tubes have different operating characteristics, this circuit will allow their use. The output tube cathode bypass capacitors are not routed to ground, but rather to B+. This is a connection called “ultra-path”, and in theory should help isolate signal AC from the power supply, basically removing the power supply from the signal path. The output transformers were originally radio-grade 5000:8 ohm parts, but were replaced by higher-quality transformers from a vintage reel-to-reel tape deck. Because this is a single-ended pentode design, inverse feedback is unavoidable or the output impedance will be very high. This makes an amplifier sound funny, and that “funny” will vary depending on the speakers used! The feedback here was carefully tuned on my speakers by playing music and turning a potentiometer connected in the loop. The human ear is still the best test instrument for audio! As long as you haven’t played it too loud….
Push-Pull 6V6 Amplifier
This amplifier was a gift to my father-in-law for Christmas a few years back. It is a distributed load push-pull output topology called “Ultra-Linear” back in the day. That is driven by a direct-coupled split-load phase inverter, preceded by a single gain stage, all using the common 12AU7. With this circuit no preamplifier would be needed, as my father-in-law has a turntable with line-level output.
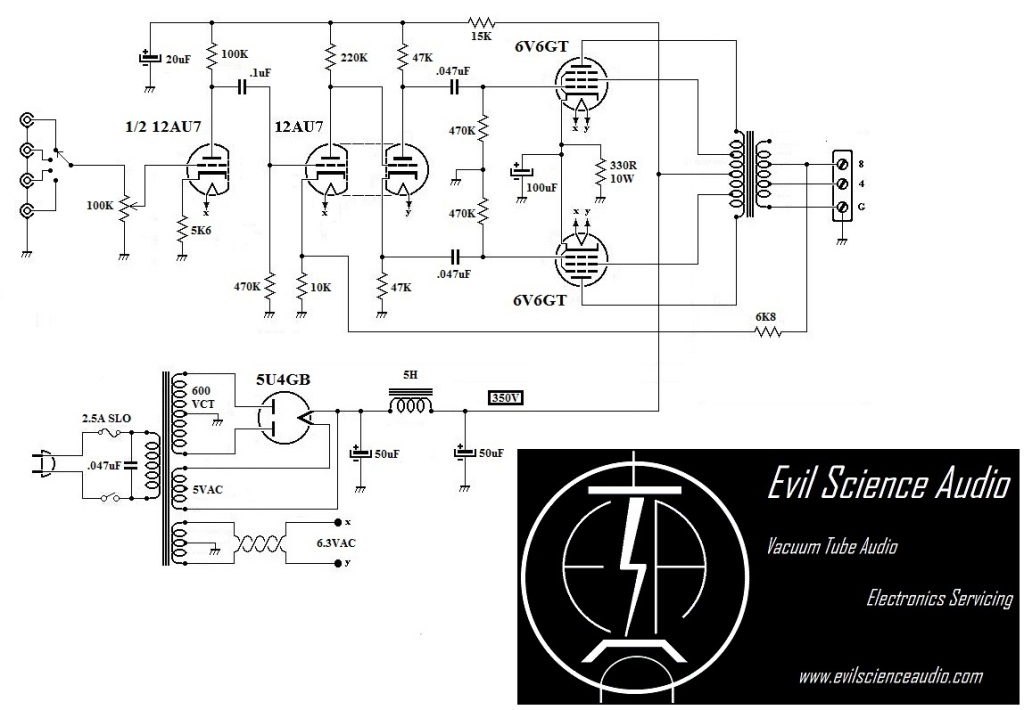
This schematic represents possibly the best bang-for-your-buck project I’ve done. Although parts were purchased new to ensure a “shiny & new” appearance, they were not expensive. This circuit contains all of the features that make tube amps what they are while minimizing inherent drawbacks.
-
Join 119 other subscribers
- Follow Evil Science Audio on WordPress.com
Evil Science Audio


